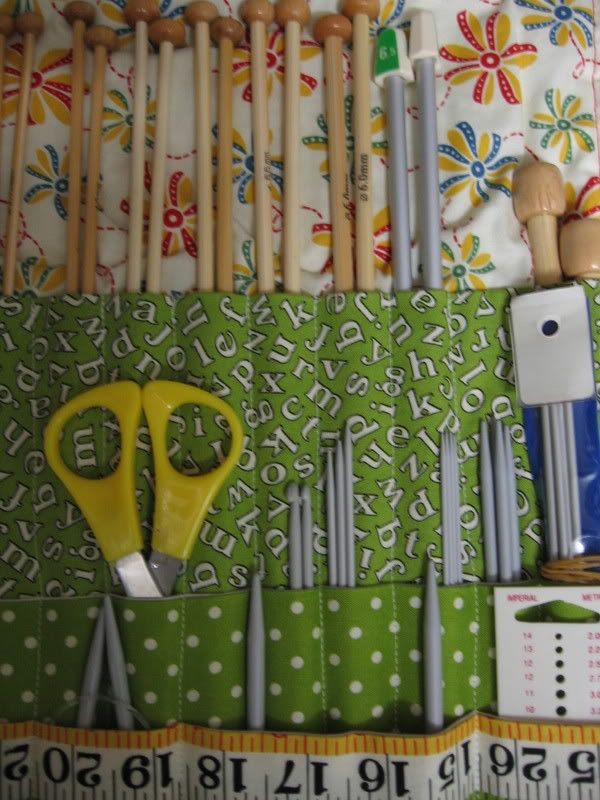
there are more pictures here of the Needle Roll to End All Needle Rolls (I call it that because it has space for more stuff than I even own).
this tutorial is now illustrated, with a different, second needle roll i made.
i've also designed this pattern in inches, despite my metric heritage. sorry. you'll cope.
Notes
- I actually cheated, and pieced together lining fabric to pretty fabric where it was covered by another pocket. If you want to do that, remember when cutting each piece to add seam allowance.
- Also, you should iron each piece after you sew it, every time. It'll look crisper, I promise. And this comes from a girl who hates ironing.
- A one inch wide pocket will hold a pair of straight needles (even 10mm thick ones!), a set of dpns up to about 6mm or so, or a few crochet hooks. A two inch wide pocket is good for circular needles up to about 5mm, needle gauges, a small set of scissors. Three inch wide pockets are needed for the largest circulars. You can redesign the number of pockets you have of each width according to what you own, if you want.
Fabric Quantities
5 fat quarters of printed fabric
20" cut from the roll of the thinnest batting you can find
25" cut from the roll of plain cotton to line the pockets
1 yard of ribbon
Cut Pieces
Outer (pretty fabric): 17 6/8" x 20 2/8"
Inner (pretty fabric): 17 6/8" x 20 2/8"
Pocket 1 (cut one of pretty fabric and one of lining): 17 6/8" x 11 3/8"
Pocket 2 (cut one of pretty fabric and one of lining): 17 6/8" x 7 7/8"
Pocket 3 (cut one of pretty fabric and one of lining): 17 6/8" x 6 3/8"
Batting: 17 6/8" x 20 2/8"
Process
1) If you want to applique anything to the outer, do it now.
2) With right sides facing, sew each pocket to its lining along the top of the pocket. Turn and press.

3) Zig-zag down each side of each pocket, sewing the lining and the pretty fabric together.
4) Zig-zag around the outer and the inner.
5) Place the three pockets on top of each other, right sides out and bottom edges aligning.
6) Measure in 7/8" from the left-hand edge of the pockets, and rule a vertical line with chalk. Continue to mark chalk lines at one inch intervals down the right side of all three pockets. There will be 7/8" margin at the right-hand side too.

7) Skipping the first chalk line, mentally assign each line a letter, A to O, from left to right. There will also be one chalk line at the end that remains un-lettered. Ignore these first and last chalklines. They will be sewn down when you sew the inner to the outer.
8) Take Pocket 1 and place it against the inner (pocket lining against right side of inner), with bottom edges aligning. Sew down columns A, C, E, and G from the top edge of the pocket to the bottom. Sew back and forth at each end to secure the stitches.
9) Take Pocket 2 and place it over Pocket 1, lining against right side. Sew down columns I, K, L, M and O, from the top of Pocket 1 to the bottom edge (where everything's aligned, remember) securing at each end. Here's what it looks like once the columns on pocket 1 are sewn, and you're up to pocket 2.

10) Take Pocket 3, place it over Pocket 2. Sew down columns B, D, F, H, J and N from the top of Pocket 1 to the bottom edge, securing stitching at each end.
11) Pin together the inner with pockets and the outer, right sides facing. Pin batting to wrong side of outer.
12) Press top edge of inner and top edge of out/ batting down half an inch, wrong side against wrong side (in this picture, the batting would be up against the wrong side of the green fabric. i ran out of batting, so cheated a little with this roll).

13) Sew around the sides and bottom.
14) Turn and press. There should be no raw edge along the top, it's already been pressed down.
15) Top stitch around all four edges 3/8" from the edge. This look pretty and will sew down the open top flap.
16) Fold the top 2" of the needle roll down towards the pockets to make the inside flap. Topstitch 3/8" from the fold to secure the flap (that's the stitching on the left-hand side in this illustration).

17) Fold the ribbon in half, and stitch it down along the topstitching line of one side of the needle roll. Seal the cut ends with a lighter or clear nail polish.

Ta-da! you have needle roll!

edit: I've had to disable comments because this post was being spammed to death. It's a pity, as I loved seeing other people's knitting needle rolls. Sorry.